Reverse-engineering WatchGuard Mobile VPN
TIP: WatchGuard has responded to this post on Reddit. If you haven't read the post yet I'd recommend doing that first before reading the response to have the proper context.
One of my current clients makes use of WatchGuard Mobile VPN software to provide access to the internal network.
Currently WatchGuard only provides clients for OS X and Windows, neither of which I am very fond of. In addition an OpenVPN configuration file is provided, but it quickly turned out that this was only a piece of the puzzle.
The problem is that this VPN setup is secured using 2-factor authentication (good!), but it does not use OpenVPN's default challenge/response functionality to negotiate the credentials.
Connecting with the OpenVPN config that the website supplied caused the VPN server to send me a token to my phone, but I simply couldn't figure out how to supply it back to the server. In a normal challenge/response setting the token would be supplied as the password on the second authentication round, but the VPN server kept rejecting that.
Other possibilities were various combinations of username&password
(I've seen a lot of those around) so I tried a whole bunch, for example
$password:$token or even a sha1(password, token) - to no avail.
At this point it was time to crank out Hopper and see what's actually going on in the official OS X client - which uses OpenVPN under the hood!
Diving into the client
The first surprise came up right after opening the executable: It had debug symbols in it - and was written in Objective-C!
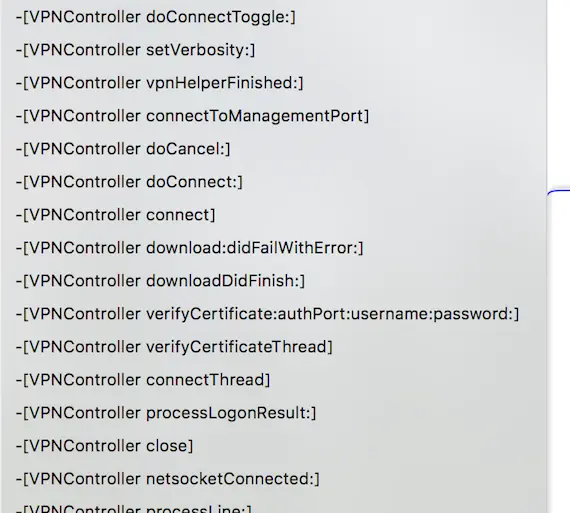
A good first step when looking at an application binary is going through the strings that are included in it, and the WatchGuard client had a lot to offer. Among the most interesting were a bunch of URIs that looked important:
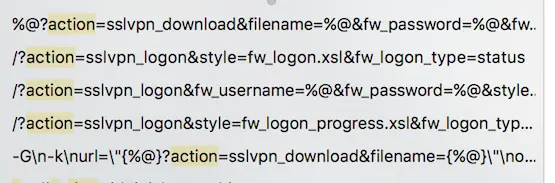
I started with the first one
%@?action=sslvpn_download&filename=%@&fw_password=%@&fw_username=%@
and just curled it on the VPN host, replacing the username and
password fields with bogus data and the filename field with
client.wgssl - another string in the executable that looked like a
filename.
To my surprise this endpoint immediately responded with a GZIPed file containing the OpenVPN config, CA certificate, and the client certificate and key, which I previously thought was only accessible after logging in to the web UI - oh well.
The next endpoint I tried ended up being a bit more interesting still:
/?action=sslvpn_logon&fw_username=%@&fw_password=%@&style=fw_logon_progress.xsl&fw_logon_type=logon&fw_domain=Firebox-DB
Inserting the correct username and password into the query parameters actually triggered the process that sent a token to my phone. The response was a simple XML blob:
<?xml version="1.0" encoding="UTF-8"?>
<resp>
  <action>sslvpn_logon</action>
  <logon_status>4</logon_status>
  <auth-domain-list>
    <auth-domain>
      <name>RADIUS</name>
    </auth-domain>
  </auth-domain-list>
  <logon_id>441</logon_id>
  <chaStr>Enter Your 6 Digit Passcode </chaStr>
</resp>
Somewhat unsurprisingly that chaStr field is actually the challenge
string displayed in the client when logging in.
This was obviously going in the right direction so I proceeded to the
procedures making use of this string. The first step was a relatively
uninteresting function called -[VPNController sslvpnLogon] which
formatted the URL, opened it and checked whether the logon_status was
4 before proceeding with the logon_id and chaStr contained in the
response.
(Code snippets from here on are Hopper's pseudo-Objective-C)

It proceeded to the function -[VPNController processTokenPrompt] which
showed the dialog window into which the user enters the token, sent it
off to the next URL and checked the logon_status again:
(r12 is the reference to the VPNController instance, i.e. self).

If the logon_status was 1 (apparently "success" here) it proceeded
to do something quite interesting:
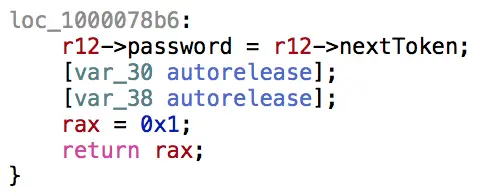
The user's password was overwritten with the (verified) OTP token - before OpenVPN had even been started!
Reading a bit more of the code in the subsequent
-[VPNController doLogin] method revealed that it shelled out to
openvpn and enabled the management socket, which makes it possible to
remotely control an openvpn process by sending it commands over TCP.
It then simply sent the username and the OTP token as the credentials after configuring OpenVPN with the correct config file:

... and the OpenVPN connection then succeeds.
TL;DR
Rather than using OpenVPN's built-in challenge/response mechanism, the WatchGuard client validates user credentials outside of the VPN connection protocol and then passes on the OTP token, which seems to be temporarily in a 'blessed' state after verification, as the user's password.
I didn't check to see how much verification of this token is performed (does it check the source IP against the IP that performed the challenge validation?), but this certainly seems like a bit of a security issue - considering that an attacker on the same network would, if they time the attack right, only need your username and 6-digit OTP token to authenticate.
Don't roll your own security, folks!
Bonus
The whole reason why I set out to do this is so I could connect to this VPN from Linux, so this blog post wouldn't be complete without a solution for that.
To make this process really easy I've written a little tool that performs the steps mentioned above from the CLI and lets users know when they can authenticate using their OTP token.